Talking and dreaming about being a better bowhunter is excellent, but it will never happen unless you dedicate yourself to a program and put that program to practice.
We’d worked hard. It was day 11 of what was supposed to be a 10-day elk hunt. We were tired, out of food, but our drive to get parallel with the screaming bull and put carbon through his lungs kept us moving forward.
Sadly, I missed the bull. Not because of sleep deprivation or any physical issues — the terrain was steep and rugged — but most elk dirt is. No, this was a mental meltdown. The second my pin hit hide on the less-than-30-yard 5×6, I hammered my release.
Can you relate? Sound at all familiar?
I realized after that hunt that something had to change, and that change had to be more than me telling myself something had to change. It also had to be more than mindlessly slinging carbon downrange day after day.
If you want to be a stick-and-string assassin and are tired of the sob stories, the time to take action — appropriate action — is now.
Start From Scratch
When you were young, and dad jerked the training wheels off the bicycle, you crashed a few times. You wanted someone there, running alongside as you pedaled. You started slow and steady and then branched out as you got more comfortable. It would be best to do the same during the spring and summer months with your stick and string.
Take a can of black or white spray paint and cover any spots or dots on your favorite foam archery target. Now, stand 5 or 10 yards from that target, and slow the process down. You’re in no hurry, and everything needs to be the same. Focus on how you get into your grip — taking caution not to get the hold inside the hand’s lifeline. Next, hook on your release as you address the target with your eyes; hold for a moment, and then bring the bow back to full draw in one fluid motion. This entire process should be the same every single time, and once let-off occurs and the cams roll over, find your two-point anchor. I prefer the string to touch the tip of my nose and the knuckle between my index and middle finger to cradle my jawline. If you shoot an index finger release, the inner knuckle on your index finger should be right on or slightly above the jawline.
Now that your bow is drawn and you’ve crawled into a repeatable two-point anchor, let your pin float on the foam target and focus on breathing and aiming. Learn what it looks like and feels like to let your pin move on the target. This is called pin-float, and you need to learn to embrace it and not fight it.
Now for the best part. Hold for 10 to 12 seconds, and let the bow down. Do not fire the arrow. If you’re worried your target panic will take over, and you’ll send carbon, set your release heavy. Do four sets of 10 on the first day, and continue the four-set routine for three consecutive days. Don’t fire a single arrow.
Baby Steps
Start day four on the same blank-face target you’ve been drawing and letting down. Begin with four draw-and let-down reps. After making a release adjustment, if you had it set heavy, go through your routine, only this time, as your pin is floating on foam, execute your shot. Focus on not jabbing or punching the trigger or button. There is no spot or dot to hit, and you’ve had 124 reps of drawing, holding, and letting down. Relax and go through the process. Stay strong in the front — driving the bow arm into the target and forcing the release hand elbow back. As you do this, relax the release hand from the wrist down. This is harder to accomplish with an index-finger release. However, the more you relax the hand, the quicker and easier the release will fire.
That’s what we want to focus on for days four through seven. No further than 10 yards — go through your routine — let the release fire the bow. If you’re manipulating your release, it may be time to consider switching to a hinge-style release or a tension release.
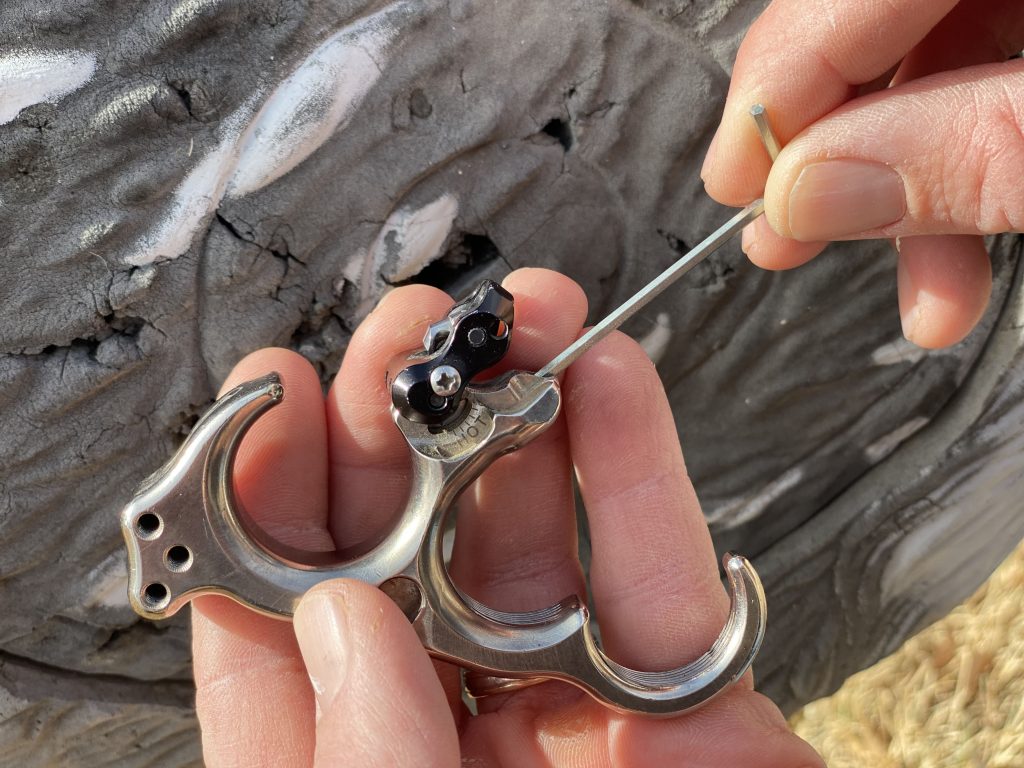
Another tip, and please only do this if you have the means — it’s not a must — is to get two of the same releases. Why? You can then set them at two different hot/cold settings, and if you put them in a release pouch, yes, even an index-fingers will work for this; you never know what release you’re grabbing. I’ve found this process helps me focus on the act of aiming and shot execution.
Things change a tad on day eight. I realize this routine may seem monotonous and overkill, but you must stay the course if you want to punch lungs consistently. It takes time to cure target panic, shooting anxiety, buck fever, or whatever you want to call it.
Getting Comfortable
Today, stay on the blank face target but stand 20 yards from the target. We still don’t want any spots or dots. Go through your process and focus on aiming at the center of the target. Let the pin float on the target’s center while you push and pull and relax the release hand wrist. After shooting a single arrow, walk up to the target and remove that arrow. If you don’t, your subconscious mind will recognize the arrow as an aiming point, and the entire process can start to unravel.
Repeat as many shots as you want from 20 yards. Be honest with yourself. If you’re trusting your pin float and letting the release fire the bow, step back to 30 yards.
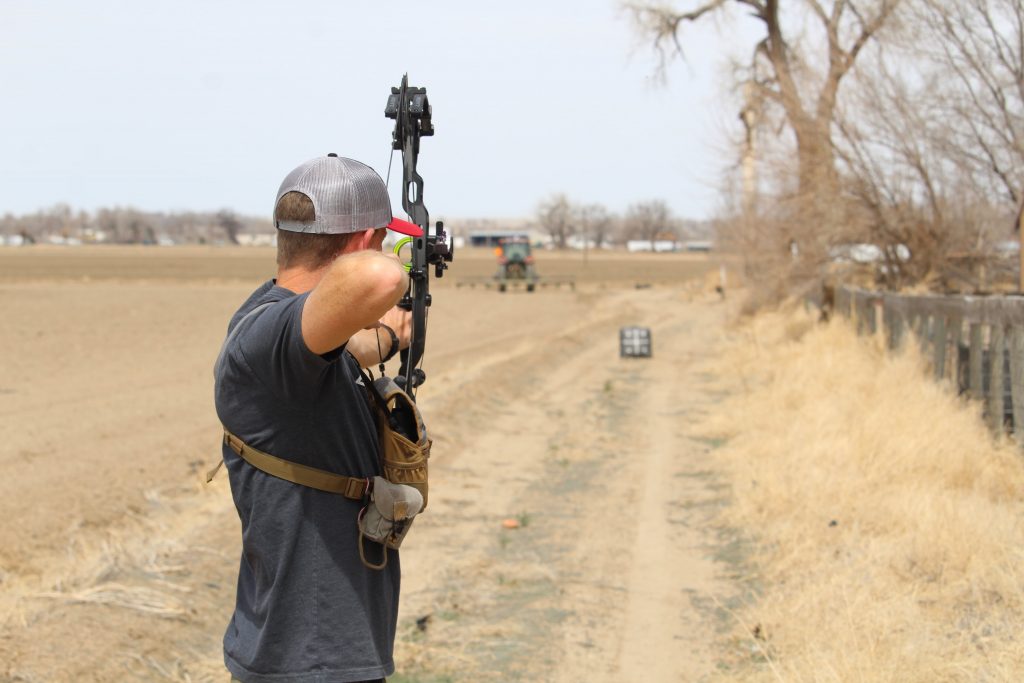
Keep this process up from day eight through day fourteen. Yes, I understand that each pin may not be dialed perfectly, but that makes zero difference now. You’ve developed a repeatable shot routine and are letting the release fire the bow, which is all that matters. As long as arrows are hitting somewhere around the target’s center, you’re more dialed than you think, and you should start stepping back in distance as far as you feel comfortable. Yes, I suggest blank-face target shooting out to the furthest distance you feel comfortable shooting. Often, I will shoot arrows at a blank-face target from over 100 yards.
You’re firing on all cylinders and doing more than talking the talk. You have dedicated yourself to a program, and your confidence is soaring. Time to shoot dots and spots, right? Negative! Starting on day fifteen, going through day nineteen, I’d like for you to move to 3-D targets. Shoot them at various ranges, and don’t be afraid to set the lifelike targets at different angles.
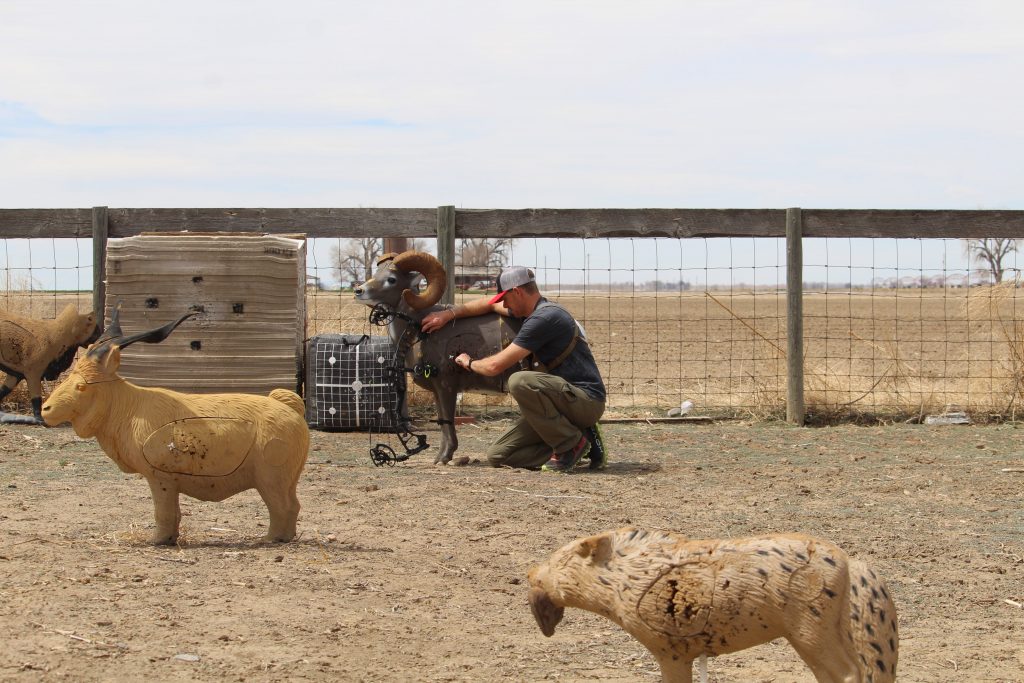
These targets have scoring rings, but they are hard to distinguish, and I ask that you don’t focus on them. Instead, go through your process and execute shots that will put a hole in the target’s (if it had them) lungs. You are training your mind to be lethal, not hit the 12 rings. Shooting 3-D targets can cause initial shooting anxiety, even after all the work you’ve put in. This anxiety is created by the space over the target’s back and under its belly. I recommend shooting at ranges no further than 30 yards on days fifteen and sixteen. Then, as long as you feel comfortable, you can move back.
Use days 20 and 21 to shoot spots and dots. This is only important because you want to be exact and want your pins and sight-tape to be spot on. They say it takes 21 days to break a habit. Congrats. You put in the time, and now this fall really will be different. You can bank on more backstraps for the grill and fewer “oh no” moments.

เกิดอะไรกับ Gold Lotto
October 1, 2025 at 1:18 pm
… [Trackback]
[…] Info on that Topic: bornhunting.com/21-days-to-better-stick-and-string-shooting/ […]
ราคาเดิมพัน พนัน NBA
October 1, 2025 at 1:31 pm
… [Trackback]
[…] Find More on that Topic: bornhunting.com/21-days-to-better-stick-and-string-shooting/ […]
Go X transportation
October 2, 2025 at 8:55 am
… [Trackback]
[…] There you can find 45802 additional Information on that Topic: bornhunting.com/21-days-to-better-stick-and-string-shooting/ […]
รับจด อย
October 4, 2025 at 4:16 pm
… [Trackback]
[…] Read More here to that Topic: bornhunting.com/21-days-to-better-stick-and-string-shooting/ […]
Aviator
October 10, 2025 at 5:49 pm
… [Trackback]
[…] There you will find 47905 additional Information to that Topic: bornhunting.com/21-days-to-better-stick-and-string-shooting/ […]
ufa569
October 17, 2025 at 10:20 pm
… [Trackback]
[…] Find More on that Topic: bornhunting.com/21-days-to-better-stick-and-string-shooting/ […]
Thai Massage Manhattan
December 1, 2025 at 3:17 am
… [Trackback]
[…] Read More Information here to that Topic: bornhunting.com/21-days-to-better-stick-and-string-shooting/ […]
blazing crown
December 17, 2025 at 9:35 am
… [Trackback]
[…] There you will find 61025 more Info on that Topic: bornhunting.com/21-days-to-better-stick-and-string-shooting/ […]
clothing manufacturer
January 17, 2026 at 2:15 am
… [Trackback]
[…] There you will find 2020 additional Info on that Topic: bornhunting.com/21-days-to-better-stick-and-string-shooting/ […]
mitolyn official
January 25, 2026 at 4:25 am
**mitolyn official**
Mitolyn is a carefully developed, plant-based formula created to help support metabolic efficiency and encourage healthy, lasting weight management.
ทัวร์ลาว
January 28, 2026 at 3:21 am
… [Trackback]
[…] Information on that Topic: bornhunting.com/21-days-to-better-stick-and-string-shooting/ […]
นำเข้าสินค้าจากจีน
February 27, 2026 at 6:15 am
… [Trackback]
[…] There you will find 74834 additional Info to that Topic: bornhunting.com/21-days-to-better-stick-and-string-shooting/ […]
RICH88 ค่ายเกมสล็อตโบนัสเยอะ
March 16, 2026 at 2:58 am
… [Trackback]
[…] There you will find 89561 additional Information to that Topic: bornhunting.com/21-days-to-better-stick-and-string-shooting/ […]
big188
March 20, 2026 at 2:18 am
… [Trackback]
[…] Read More on to that Topic: bornhunting.com/21-days-to-better-stick-and-string-shooting/ […]
จองเรือ disney cruise
March 20, 2026 at 3:56 am
… [Trackback]
[…] Read More Info here on that Topic: bornhunting.com/21-days-to-better-stick-and-string-shooting/ […]
Solaranlage installieren lassen
March 27, 2026 at 12:05 am
… [Trackback]
[…] Find More here to that Topic: bornhunting.com/21-days-to-better-stick-and-string-shooting/ […]
ข่าวพรีเมียร์ลีกล่าสุด
March 31, 2026 at 6:27 am
… [Trackback]
[…] Find More here on that Topic: bornhunting.com/21-days-to-better-stick-and-string-shooting/ […]
บริการจัดหาแม่บ้าน
April 19, 2026 at 11:55 pm
… [Trackback]
[…] Information on that Topic: bornhunting.com/21-days-to-better-stick-and-string-shooting/ […]
naukabel.ru
April 20, 2026 at 6:10 pm
… [Trackback]
[…] Here you will find 442 additional Information to that Topic: bornhunting.com/21-days-to-better-stick-and-string-shooting/ […]
แทงบอลเกาหลี
April 27, 2026 at 4:20 am
… [Trackback]
[…] Find More Info here on that Topic: bornhunting.com/21-days-to-better-stick-and-string-shooting/ […]
ยางยอย
May 9, 2026 at 4:38 am
… [Trackback]
[…] Find More here on that Topic: bornhunting.com/21-days-to-better-stick-and-string-shooting/ […]
เน็ต บ้าน ais
May 11, 2026 at 12:01 am
… [Trackback]
[…] Information to that Topic: bornhunting.com/21-days-to-better-stick-and-string-shooting/ […]
Title Abstractors in Arizona
June 25, 2026 at 7:53 pm
… [Trackback]
[…] Here you will find 87289 additional Info to that Topic: bornhunting.com/21-days-to-better-stick-and-string-shooting/ […]
คลิปหลุด
June 27, 2026 at 12:15 am
… [Trackback]
[…] There you can find 25543 additional Information on that Topic: bornhunting.com/21-days-to-better-stick-and-string-shooting/ […]
บาคาร่าเกาหลี
June 28, 2026 at 1:37 am
… [Trackback]
[…] Read More to that Topic: bornhunting.com/21-days-to-better-stick-and-string-shooting/ […]
เว็บพนันเกาหลี
June 28, 2026 at 3:23 am
… [Trackback]
[…] Find More Information here on that Topic: bornhunting.com/21-days-to-better-stick-and-string-shooting/ […]
789บาคาร่า ทางเข้าเล่นเลขมงคล
June 28, 2026 at 3:46 pm
… [Trackback]
[…] Find More here on that Topic: bornhunting.com/21-days-to-better-stick-and-string-shooting/ […]
sabaaibet
June 29, 2026 at 2:50 am
… [Trackback]
[…] Info to that Topic: bornhunting.com/21-days-to-better-stick-and-string-shooting/ […]
Kamagra
June 29, 2026 at 11:51 pm
… [Trackback]
[…] Info to that Topic: bornhunting.com/21-days-to-better-stick-and-string-shooting/ […]
go here
June 30, 2026 at 10:13 pm
… [Trackback]
[…] Information to that Topic: bornhunting.com/21-days-to-better-stick-and-string-shooting/ […]
iux ดีไหม
July 1, 2026 at 4:42 am
… [Trackback]
[…] Find More Information here on that Topic: bornhunting.com/21-days-to-better-stick-and-string-shooting/ […]
หวย24
July 1, 2026 at 10:40 pm
… [Trackback]
[…] Find More on on that Topic: bornhunting.com/21-days-to-better-stick-and-string-shooting/ […]
บริการรับส่งผู้ป่วย
July 1, 2026 at 11:19 pm
… [Trackback]
[…] There you can find 40997 more Info on that Topic: bornhunting.com/21-days-to-better-stick-and-string-shooting/ […]
ผลบอลต่างประเทศ
July 3, 2026 at 9:30 pm
… [Trackback]
[…] Info on that Topic: bornhunting.com/21-days-to-better-stick-and-string-shooting/ […]
ทัวร์ญี่ปุ่นส่วนตัว
July 4, 2026 at 8:39 am
… [Trackback]
[…] Info to that Topic: bornhunting.com/21-days-to-better-stick-and-string-shooting/ […]
ต่อผม
July 5, 2026 at 12:47 am
… [Trackback]
[…] Read More Information here on that Topic: bornhunting.com/21-days-to-better-stick-and-string-shooting/ […]
cineb hd
July 6, 2026 at 12:20 am
… [Trackback]
[…] Find More Information here to that Topic: bornhunting.com/21-days-to-better-stick-and-string-shooting/ […]